How to Make a DIY Fire Bowl to Warm Up Your Backyard Gatherings

- Working Time: 3 hours
- Total Time: 4 weeks, 2 days
- Skill Level: Beginner
Spend more time in your backyard and relish those crisp fall evenings while sitting around this super simple concrete fire bowl. It adds a warm glow to your outdoor space and requires much less effort than building a fire pit. To make a DIY fire bowl, use two different-size plastic planters as molds (we trimmed off the lip of the smaller planter) and fill with a customized concrete mix. Once the concrete has cured, remove the molds and fill with fire-safe stones ($41, Wayfair) from a fireplace store (ordinary rocks might contain air pockets and moisture that cause them to break or burst). Then, simply use logs to create your fire or tuck cans of gel fuel made for fire bowls into the rocks.
Editor's Tip: Before you put a fire bowl in your yard, check your local municipal fire safety codes and association rules to make sure your fire bowl—and the location you intend to place it—is up to code.
What You'll Need
Equipment / Tools
- Dust mask
- Waterproof gloves
- Tub for mixing concrete
- Plastic trowel
- Hot glue gun
- Small shovel
- Bricks or heavy rocks
- Sheet plastic
- Metal file
Materials
- White cement
- Quartz sand
- Perlite
- 12- and 16-inch-diameter plastic planters
- Small piece of pipe
- Vegetable oil spray
- Chicken wire
- Fire-safe decorative stones
- Solid-gel fuel
Instructions
-
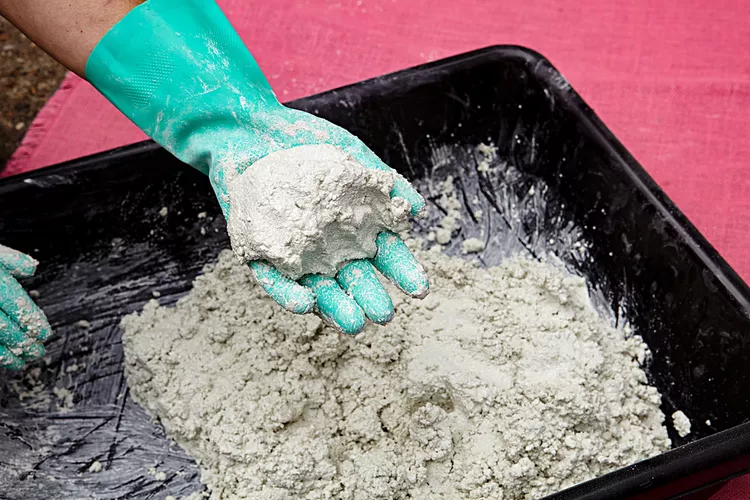
Create Cast Mixture
Wearing a dust mask and gloves, blend equal parts of white cement, quartz sand, and perlite in a large tub. Slowly add water, and mix the concrete with a plastic trowel to form a consistency of soft dough that holds its form when squeezed into a handful.
Safety Tip: Always wear a dust mask when working with concrete and cement to avoid the small particles getting in your lungs.
-
Create a Drainage Hole
Use a hot glue gun to attach a short piece of pipe to the center of your large planter. Let dry. This will create a drainage hole when you add the concrete.
-
Make Molds Non-Stick
Prepare the planter molds by spraying vegetable oil on the inside of the large one and the outside of the small one. If the containers are not oiled, the concrete will adhere to the plastic mold. If you don't have an oil spray on hand, using a paintbrush to rub oil on the molds works, too.
-
Place Mixture in Mold
Working quickly, shovel prepared concrete into the large planter, roughly forming a bowl shape approximately 2 inches thick. Avoid shoveling concrete over the pipe opening.
-
![place chicken wire into bowl with mix]()
![placing inside larger planter with mix]()
![add concrete around inner plastic mold]()
PHOTO: Cameron Sadeghpour PHOTO: Cameron Sadeghpour PHOTO: Cameron Sadeghpour Create the Bowl Basin
Press a sheet of chicken wire into the concrete, bending it into a bowl shape. This will provide extra support inside the finished concrete "walls." Press the small planter firmly into the center; push hard to shape and smooth the inside of the fire bowl. You might need to set some bricks or heavy rocks inside to hold it in place while you add additional concrete around the edges. Cover the concrete bowl with a sheet of plastic; let cure for three days before you move it.
Editor's Tip: If you notice bubbles in your wet concrete mixture, lightly tap the exterior bowl with a rubber mallet to allow the bubbles to rise to the top. If that doesn't do the trick, gently run a palm sander around the perimeter of the exterior bowl to loosen up the air pockets.
-
![remove top planter mold from concrete]()
![remove concrete firebowl from plastic molds]()
PHOTO: Cameron Sadeghpour PHOTO: Cameron Sadeghpour Remove Fire Bowl from Mold
When cured, remove the plastic and inner planter, carefully turn over the large plastic planter, and tip out the concrete bowl. Wrap the fire bowl in the sheet of plastic, and allow it to cure in a shaded place for three weeks. When hard and dry, file the top edge of the bowl smooth.
Editor's Tip: Recruit a friend or family member to help remove the concrete form from the mold and use caution to make sure your fingers (and the form) aren't damaged in the process.
-
Add Stones and Fire Gel
Fill the concrete bowl with fire-safe decorative stones. Tuck cans of solid-gel fuel among the stones, using one, two, or three cans of fuel—the more cans of fuel, the hotter the fire. If you prefer, the concrete is also safe to use with logs.
Safety Tip: Cooking food, including marshmallows, directly over a gel fuel flame is not recommended. If you plan to use your fire bowl for cooking, use real logs instead.
:strip_icc():focal(639x0:641x2):format(webp)/adding-chicken-wire-step5-2268a71d-6056a7420de14d468068ec0575f7ac7e.jpg)
:strip_icc():focal(639x0:641x2):format(webp)/place-second-planter-step5-da33e37a-18f722a902f44f90abbe2807be8bd434.jpg)
:strip_icc():focal(639x0:641x2):format(webp)/shovel-second-layer-concrete-step5-599aaf52-afde5fbd51284065a962f836dacc8629.jpg)
:strip_icc():focal(639x0:641x2):format(webp)/removing-planter-mold-step6-e27ddcf1-67def80c2d2d4ffbbd016e1f082780e6.jpg)
:strip_icc():focal(639x0:641x2):format(webp)/removing-concrete-fire-bowl-step6-83b40ab9_0-8ad9a83dffd542509fa4a88827f7a8a0.jpg)