How to Plant Balled-and-Burlapped Trees & Shrubs

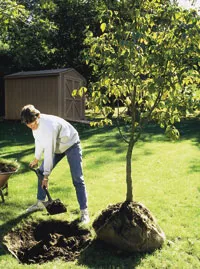
Trees sold with their roots in soil wrapped in burlap tend to be larger and more mature. These B & B (balled and burlapped) trees grow in the ground and are dug in late winter or spring, wrapped, and shipped to garden centers.
Sometimes the burlap-wrapped root ball is covered with a wire cage to stabilize it and make carrying easier. Although they're more difficult to handle, B & B plants generally transplant successfully. When properly cared for, they can sit safely for months at the nursery, where the root balls may be buried in mulch to keep them moist. When the tree is sold, its branches are bound loosely with twine to prevent damage during transport and planting.
In the past, suppliers traditionally used standard burlap because it's tough, its natural fibers rot in the hole, the soil around the roots isn't disturbed, and it makes planting easier. Today's "new" burlap is made from synthetic fibers. It's difficult to detect and doesn't decay in the soil. Cut away as much as possible from the sides of the root ball after you've positioned it properly in the hole. Because most roots grow laterally, this will ensure unobstructed progress. If the ball is encased in a wire cage, cut it away, too. Then you can get at the burlap and remove it.
What You'll Need
Equipment / Tools
- Shovel or spade
- Tarp
- Stakes (optional)
Materials
- Burlap-wrapped plant
- Water
- Mulch
- Tree wrap (optional)
Instructions
Getting Off to a Good Start
Because the first priority for a newly-planted tree or shrub is to establish and grow roots, use a kelp or mycorrhiza growth product at planting time to help it get started. Delay spreading granular, slow-acting fertilizer until the plant indicates its roots are established and functioning by showing new stem and leaf growth.
-
Examine the tree before you buy it.
Reject those with gouges, scrapes, or wounds on the trunk. Look, too, for girdling roots encircling the base of the trunk under the burlap wrapping.
-
Spread a tarp for the soil.
Dig a hole with sloping sides as deep as the root ball is high, and at least half greater than the width. Don't add anything to the hole or soil.
-
Remove any protective outer wrapping.
Remove any protective outer wrapping, but leave the burlap on to hold the roots while you position the plant in the hole. Untie the branches to determine the most pleasing aspect.
-
Cut away as much burlap as you can.
Roots grow laterally, so fabric under the ball can remain. Be sure the top of the root ball -- where the roots flare out from the trunk -- is at or above ground level.
-
Fill in the hole.
Use the plain loose soil on the tarp to fill in the hole around the root ball. Water it when the hole is half full to prevent air pockets. Check the root ball level again and raise if it has sunk.
-
Finish filling the hole and firm the soil.
Form a ridge of soil just beyond the edge of the hole to create a water reservoir. Water slowly and deeply. Fill the reservoir and let it drain.
-
Spread mulch and unwrap branches.
Spread a 2 to 3-inch layer of organic mulch over the root zone to discourage weeds and retain soil moisture. Unwrap the branches if they remain tied. They will take time to regain their normal attitude.
-
Apply tree wrap.
Use tree wrap to protect the tender bark on young trees threatened by rodent and sun damage. Follow the instructions on the package to ensure proper application.